Showing posts with label Cards. Show all posts

Thursday, June 30, 2011

Young Crafters Unite Blog Hop!

If you are participating in the Young Crafter Unite Blog Hop you've just visited Joy's blog Less Is More. If you need want to start at the beginning click here!
(Don't forget to comment to be eligible for some awesome prizes!)


If this is your first time here you may be wondering about the title of my blog. It is named after my "babies", Luigi (an Eclectus parrot) and Stormy (a Russian Blue Cat)! :o)


First things first: What makes me a young crafter? I am nearly 26 years old and I am a lifetime crafter. I have always enjoyed doodling, scrapbooking and creating in general, and just recently found the craft of card making when making my wedding invitations. Once I found this card/paper crafting community I knew I had found my type of people! I started this blog so I had a place to chronical my crafting adventures to share with the world and hopefully inspire others the way so many of you have inspired me.
(I'm especially talking to you Britta! You rock!)

I don't know what I was thinking! I made this card for this blog hop, but posted it the day I finished it (which was Wednesday) instead of saving it for today.
DUH! Oh well - this card is in two posts in a row!!

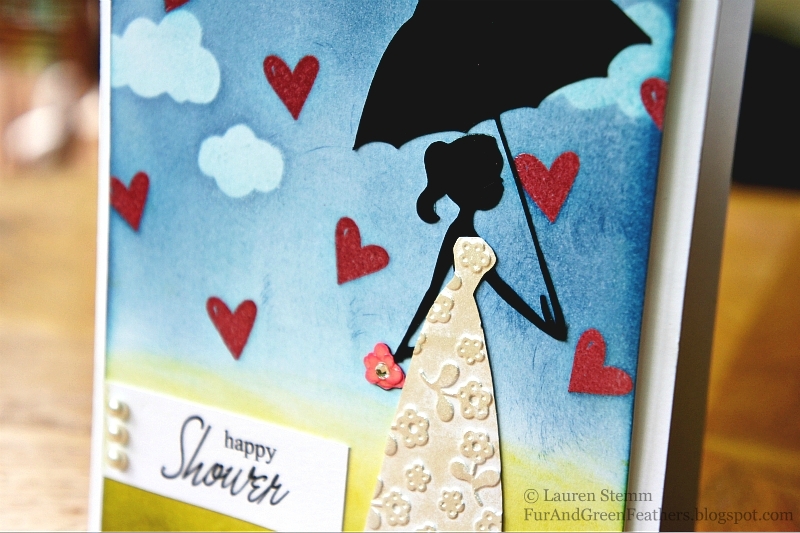
Here is my card project:


My favorite thing to do is cut SVG files with my digital cutter. (Right now I am using a Cricut, but I am saving up to purchase a Black Cat Lynx!) So that brings me to my favorite company, which is... SVGCUTS.COM The bride image in my card is from svgcuts.com's svg set called "Kate's Silhouettes", which happens to be my favorite set of svg's ever! Another favorite thing included in this card: Tim Holtz's Distress Inks. If you have never used these inks, or you simply want to learn about different ways to use them, watch Britta's "No Stress Distress Inks" tutorials on YouTube! If you'd like to learn more about how I made this card, please scroll down or click here to read my previous post about this card.

But Wait! There's MORE!!


I was inspired by this blog hop to tackle a craft project I have been putting off for over a year! When we purchased our home this ugly light fixture (in my opinion!) was hanging in the dining room. I have been looking around for a new one, but I never found what I wanted. So I decided to totally renovate the existing fixture.
Here is what it looked like before:


And this is what it looks like now:


I spray painted the fixture in "Cherry Red" Kylon paint. After much searching I found the chandelier shades at Lowe's. I love the fabric - which I bought at Walmart for less than $5 yd. I adhered the fabric using spray adhesive. The ribbon and trim I purchased at JoAnn Fabrics, and I simply used my hot glue gun to adhere it.

I am very proud of the transformation... and I can't believe I have lived with that dated chandelier for a year now! It took me a few hours to make something beautiful and that completely transformed my dinning room!


So glad you stopped by to check out my blog! Please come back! :D
Comments are always welcome and appreciated! And you are eligible for some awesome prizes when you comment during this blog hop! Let me know what you think!

The next blog in the hop is: Wendy's blog Happy Stamping Designs

Tuesday, June 28, 2011

Bridal Shower and Wedding Cards

This summer we had two friends get married... which gave me the opportunity to make some fun cards! First, here is my bridal shower card.


I wanted to make a card incorporating one of the bride svgs in the "Kate's Silhouettes" kit from svgcuts.com, as well as the concept of a "shower" of love. Using white cardstock as my base I stamped the hearts in VersaMark ink and then used some red embossing powder to give them dimension and shine. I created the background using distress inks and ranger's foam applicators. I masked some areas off with cloud shapes too. I cut out the bride and dress svg using my Cricut and SCAL2. The dress I embossed using my Big Shot and the Sizzix flower folder. I rubbed Ranger's Perfect Medium (which comes in the kit with the Perfect Pearls) all over the dress and then wiped on the Perfect Pearls powder. To adhere the powder to the dress permanently I sprayed it with hairspray. The umbrella is a font from WC Sold Out E bta which I downloaded free from dafont.com. Finally the sentiment I created in Microsoft Word and printed onto white cardstock. I added some pearls and a diamond to the bouquet for some extra sparkle.

I think this card conveyed the idea that I wanted the bride to be "Showered in Love"! But, in case my card front didn't get the message across, here is the inside of the card. I sure wish I hadn't spelled Forecast wrong! Oh well!!


And here is a close up:


Products Used
Stamp: Fiskars "Thank You" set (Heart)
Embossing Folder: Sizzix Flowers (Dress)
Ink: Distress Ink (Broken China, Faded Jeans, Crushed Olive, Peeled Paint), VersaMark
Additional: Perfect Pearls & Perfect Medium, Sticky Pearls
SVGs: svgcuts.com "Kate's Silhouettes" (Bride), font "WC Sold Out E bta" letter n (umbrella)

And here are the wedding cards!


The bride's favorite flowers are Sunflowers, so I had to make her a card using the awesome 3D SVG sunflower from SVGcuts.com! I used some metallic ink on the ends of the sunflower centers and used some yellow Perfect Pearls to add the simmer in the middle of the flowers. I used SCAL2 to create the cut out names. I made the background paper using a direct to paper technique with both Mustard Seed and Wild Honey distress inks. Then I stamped the sunflower image in Tea Dye Distress Ink. I also used a filigree stamp (which is hard to see in the picture) with the Mustard Seed ink.


And here is the inside of the card. Like I usually do, I simply typed up what I wanted the card to say in Word and printed it out on my laser printer. It is really easy to do this and I think it makes the card look more professional.

Products Used
Stamps: Fiskars "Family" set (filigree), PSX "E-2564" (flower)
Ink: Distress Ink (Mustard Seed, Wild Honey, Tea Dye), Brilliance (Cosmic Copper)
Additional items: ribbon, brads, perfect pearls (perfect gold)


Here is another quick wedding card I recently made.


The bird image is a SVG from the "banner day" svg set from LetteringDelights.com, which is a fabulous website! Both birds were cut on white cardstock. I inked the birds with Anirondack Alcohol Inks. I made the blue bird using a mixture of "Stream" and "Pearl" and the green bird using "Pearl" and "Lettuce". It was my husband's idea to mix-match the wings, which I love! The top of the wings are adhered with glue and the bottom of them is adhered with foam dimensionals, so the wings are lifting off the page.

Products Used
Stamps: PTI Mega Mixed Messages (Love), Studio g ditto (Botanical Background)
Ink: Memento (Tuxedo Black), Brilliance (Platinum Planet), Adirondack Alcohol Ink (Lettuce, Stream, Pearl)
Patterned Paper: K&Company (Pink Posey)


Thursday, June 16, 2011

Graduation Congratulations!

Wow - I can't believe it has been two months since I last posted.  So much has been going on!  I have a ton of pictures all edited and ready to post... so stay tuned.  I will be posting frequently!!

What do you think of my blog's new look? I created the header and blog background, as well as other elements all on my own! I have never taken a HTML code course - so I had to teach myself.  As for creating the digital background, I learned so much from this awesome tutorial on the blog Kevin & Amanda.  I used various digital scrapbooking papers and elements from Summertime Designs, which offers tons of free kits.  And finally - I used a file from my favorite website, SVG Cuts, for the awesome girl silhouette in my header!  I used the free program, GIMP2, which is the most amazing free resource I have ever come across.  

Today I wanted to share two of my most recent cards, which were for cousins who both just graduated from college.  I used the freebie image from SVGCuts.com called Graduation Cuddly Friends to make these cards.  


My husband has a great cousin, Patrick, who is my only family member currently following my blog... in fact he was one of my first ever followers!  So I'd like to say a huge THANK YOU Pat for all of your support!! :o)  About a week ago Pat graduated from Zane State College!!  Here is the card I made for him:


I've had this 12x12 congratulations paper forever, and finally found a great use for it!  I inked it with Broken China Distress Ink so it would match Zane State's colors.  I embossed the graduation cap and gown with my Sizzix Diamonds Texturz plate using my Big Shot.  Then I inked the embossed areas lightly with the Broken China ink.  I colored the skin using Copic marker E00 and simply free handed the face.  The eyes were made using various punches I have.  Finally, my Cricut is not cutting very accurately anymore so I wasn't able to cut out the diploma SVG that came with this file without it looking terrible.  So - I made my own diploma by simply rolling paper and stamping it with the Congrats to the Grad sentiment from Papertrey Ink's Mega Mixed Messages.  I also stamped the envelope with a rubber stamp.  

I really loved how this card turned out... so I couldn't stop there.  I decided to make another one, this time for my cousin Hilary who just graduated from Bowling Green State University.  Here is her card:

I made this card using the same techniques, just switched up the colors and a few other elements.  I used the Sizzix Dots embossing folder on the cap and gown.  Once I did that I thought it still wasn't feminine enough so used a flourish stamp to add some subtle detail. 

Here is a close up of the cards:


Here is a photo of the inside of the cards.  I used Inkscape to trace the logos and cut them in SCAL2.


Products Used
Stamps: PTI Mega Mixed Messages (Sentiment), Fiskars Family (Flourish), River City Rubber Works "Graduation Hand & Hats" (just the hats part)
Ink: Tim Holtz Distress Ink (Broken China, Wild Honey, Walnut Stain), Memento Black
Copics: E00 (skin), Y21 (blonde hair), B00 & YR04 (detail on tassels)
Embossing: Sizzix Diamonds Texturz, Sizzix Dots Folder
Ribbon: Darice (Halloween Fun)

Friday, April 1, 2011

Spring Card Challenges

Many sites are currently having Springtime card challenges, and I wanted to participate!  One of the challenges was Bunnies, so that was my inspiration for this card.


My Mother-in-law gave me all of her old stamps, and this border stamp was part of her stash.  I am always so glad when a challenge gets me to use her old rubber mounted stamps.  I typically just use my new clear polymer stamps, but there is something special about stamping with her previously loved stamps.  


 I colored the images with both Prismacolor pencils and Copic markers.  The majority of the image was colored with the pencils and then blended with mineral spirits.  I love the effect you can get with the mineral spirits and pencils.  

Products Used
Stamps: Stampin' Up! (border), PTI Friendship Jar Spring Fillers (sentiment)
Patterned Paper: K&Company (from Super Paper Pad), Core'dinations (So Mod)
Prismacolor Pencils, Copics (B00, E33)
Glossy Accents and Diamond Stickles

Challenges
Creative Cowgirls Challenge Blog: Spring or Easter
Crafty Creations: Bunnies
Stampers R Us: Spring Theme


Make it Monday #8 & Other Challenges

PTI's Make it Monday for this week is Ink Blending Techniques.  Here is my creation:


To create the background I embossed my paper using a Sizzix Texturz plate.  I really wanted the flowers to stay white, so I decided to use the debossed side of the paper.  To make sure the ink wouldn't go into the debossed areas I colored them with a white crayon.  Then I used some distress ink to create the background.  I simply used a tissue to wipe the ink off of the crayon wax, and Viola! The flowers really pop off the paper in person.    

Products Used
Embossing Plate: Sizzix Texturz plate "Flower Rings"
Paper: PTI Stamper's Select White Cardstock
Ink: Tim Holtz Distress Inks (Wild Honey, Mustard Seed)
Memento (Rich Cocoa), ColorBox (Canary)
Stamps: PTI Mega Mixed Messages ("thanks" sentiment)
The Paper Company Dots and Stripes stamp set 

Challenges
Papertrey Ink:  Make it Monday #8

Thursday, March 31, 2011

Spring Birthday Card

Tomorrow is my Aunt's birthday.  I always remember her birthday because it is on April Fools Day!  I made this card for her today.  I am heading to the post office as soon as I post this... I sure hope she gets it tomorrow!  


Products Used
PTI: Tulip - Friendship Jar Spring Fillers set, sentiment - Mega Mixed Messages set
Hampton Art: Border Backround stamp(script background)
Ink:  Tea Dye Distress Ink, Memento Rich Cocoa
Border Punch: Martha Stewart Doily Lace
Colored with Copic Markers, BV00, BV04, YG11, YG63


Wednesday, March 30, 2011

New Home Card

It is SNOWING... again.  And not just a little.  The ground is covered and it is coming down heavy. I am most definitely not a fan.  The saying is "if you don't like the weather in Ohio, wait five minutes and it will change".  The last two months this has been very true.  We have had weather in the 60's one day and heavy snow the next.  I am whole heartedly ready for Spring!!

 Anyways - My oldest friend and her fiancée just moved into their first home. 
 I am SO incredibly happy for them so I made them this card.   

 I couldn't find a house SVG file that I liked so I created this house in Adobe Illustrator. 
 It was my first real attempt at making my own SVG file, so I'm happy with how it came out.  

Well that's all for today.  Hopefully I will have something better to post tomorrow. 
 I need some sunshine, this snow really dampened my spirits! 

Tuesday, March 29, 2011

Spring Butterfly Card

Lately it has beautiful and sunny outside... but absolutely frigid! 
So I decided to make a card that looks warm and Springy!  

Challenge: Res-Q Challenge Blog's Scrub it Up challenge
Inspiration: The butterfly scrubs, purple, blue and green

How I made this card: I started with white card stock, freehanded some cloud templates and used Tim Holtz Faded Jeans and Tumbled Glass distress inks to color the sky.  Using SCAL I cut out the butterfly image, which was from the free font aptly called Butterflies.  You can find the font here.  I created the butterfly bodies using the basic shapes in SCAL.  The grass border was a freebie file from Pigtails Paper Trails. I inked up the edges of the grass, added some crystal stickles to the wings and wa-la! A spring card that makes me yearn for warmer temperatures!


Sunday, February 13, 2011

Go-To Sentiment Card

I've been meaning to post this card all week and time has just gotten away from me!  Last Monday was the start of "Make It Mondays" from Papertrey Ink.  The first challenge is to make a Go-To Sentiment card.  I only have five PTI stamp sets right now and four of them are Christmas oriented so my card had to have a winter theme.  Here is what I created!
Paper: DCWV Christmas Combo Stack
Stamps: Big & Bold Holiday Wishes, On Ice, & Friendship Jar Holiday Fillers
Ink: Tim Holtz Distress Broken China, Memories Baby Blue & Dew Drop Brilliance Platinum Planet
Shape cut on Cricut

Sunday, February 6, 2011

My Final PTI Card Today

This is it! my last card for PTI's anniversary challenge Day #2. 
For this card I used the lovely hearts created by Lisa Johnson.


If you are familiar with my blog you know that I am obsessed with SVG Cuts!  They have great SVGs for free and to purchase for use with your Cricut and Sure Cuts A Lot software.  This fantastic dino image was a free file!  He is supposed to be holding a heart, but I think this image by Lisa Johnson is much better!  I colored the hearts with Copics and used Glossy Accents on the big heart and Stickles on the smaller one.  I also added some perfect pearls to the rest of the circle.

Making these cards with the freebie's was so much fun.  I loved having a challenge to do and only about 24 hours to do it!  I am looking forward to using these tags in future projects.

Another PTI Card

I wanted to make more cards using the free stamps from PTI for their anniversary challenge today.  Here is the card I made using the adorable rainbow and sentiment by Melissa Bickford.


I made this card out of random paper I had laying around.  I colored the rainbow with Copics and then used a VersaMarker to wet the image and embossed it with clear embossing powder.  It really added a lot of shine! The sentiment is from a bunch of old stamps my mother-in-law gave me - it says (c) D.O.T.S. on it.  I also inked around the edges of the card with Niagra Mist VersaMagic ink.  


Papertrey Ink Anniversary Challenge #2

I decided to check Nichole Heady's blog before I went to bed... and today's challenge literally got me too excited to sleep!  It is going on 3am and I want to keep crafting.  

Today's challenge is to make a card using one of the great free 4th Anniversary tags created by Papertrey's amazing design team!  I chose to use the tag designed by Dawn McVey.  I love love love her designs!  Here is her tag:

And here is my card:


I embossed the background with the Diamonds Sizzix Texturz plate and used a nail file to buff the raised parts to add more visual dimension.  The shapes around the tag I cut out on the Cricut.   The sentiment stamp is from PTI's Friendship Jar Holiday Fillers stamp set.  You can't tell from the photo but Dawn's circle is raised by foam dimensions and with the blue ring around it the tag really pops!  

You have until 7am tomorrow (2/7/11) to enter this challenge... and you can enter up to 9 times by using all 9 of the tags made by PTI's design team.  If I wasn't so tired I would keep making them tonight.  Maybe I'll be able to fit in another one or so later on in the day!  


Saturday, February 5, 2011

Papertrey Ink 4th Anniversary Celebration!

If you haven't been able to tell yet from my previous posts, I LOVE PAPERTREY INK!! They are simply the best place to purchase stamps.  They are celebrating their 4th anniversary right now, and having great festivities along the way.  To follow along check out Nichole Heady's blog.

The first contest is for the world's most AMAZING prize aptly called the "Ultimate Card Kit", which includes: 22 stamp sets, 20 dies/die collections, felt, ribbon, buttons, cardstock and more (over $700 worth of fabulous stuff)!!  I never win anything... but I couldn't pass up this chance!  To enter this contest you have to post your favorite card from 2010 made using Papertrey products.  Here is my favorite creation.


The Papertrey product used in this card are the Candy Canes from Friendship Jar Holiday Fillers and the sentiment from my favorite holiday stamp set On Ice.   The candy canes are colored with Copic R29.  I cut out the trim and banner (created myself!) on my Cricut and the background was embossed in the Sizzix dots folder.  This picture doesn't really do this card justice.  It looks simple on here, but in person the candy canes visually pop right off the card.  I loved the way this card came out... and I love the stamps I used! 

 I made all my Christmas cards this year using Papertrey stamps and dies.  I posted photos of them in an earlier post which you can see here.  

Friday, January 21, 2011

Birthday Bonanza!

This weekend we are celebrating two birthdays in the family, which gave me an excuse to make some cards today. The first card is for my "Aunt". (No blood relation but love her just the same!)  She loves vibrant colors and designs so I thought this card would be right up her alley.  The flowers (PSX) are stamped in VersaMark and embossed with clear powder.  The sentiment (SU) is stamped in Walnut Stain Distress Ink .  The tag is from a K&Company tag pad.  I made this card by following CPS's sketch this week.  I think she will love it!


This card is for my dad who is a cowboy at heart. He grew up in Utah and his shoes of choice are always a pair of cowboy boots!  Using the Cricut I made the cowboy bootspresent and party monster using SVGs from SVG Cuts.  The party hat is from http://mycricutscrapbooking.com/

My First Card Sketch Entries!

Something fun I've found when looking at people's crafting blogs are Card Sketch challenges.  
So here is my first one ever!!  I made this card to meet the criteria of a few different challenges.  

The sketch design is from  Card Patterns sketch #98.  
 

I incorporated some cute polka dot ribbon into this card as well which meets the criteria for the Wee Memories Challenge #39 - use any ribbon of your choice in a project.

Finally, the theme is "Love" which is the word of the day on 365 Cards challenge Day 327 Love. 


These are so much fun! I am looking forward to may more sketch challenges!

Thursday, January 13, 2011

Gift Card Holders from SVGcuts.com

I love, love, love the website SVGCuts!  SVGs (Scalable Vector Graphics) are the types of images the software Sure Cuts a Lot uses to cut on the Cricut.  SVGCuts has great freebies and files you can purchase.  I purchased their Gift a Gift Card SVG Kit, which has 20 different gift card holders for $5.99.  These are the gift card holders I made using this kit.
Not only did these hold gift cards, they also served as the tag for my nephews' Christmas gifts! Aren't they awesome?!


My husband and I sent the following card to my brother and sister-in-law for them to purchase a Nintendo Wii.  I found a free "Wii font" online, which I used for the wording on the card.  

If you are interested in Sure Cuts a Lot check out http://www.scrappingtable.com/home.html.  I purchased my copy of SCAL from Michelle (Scrapping Table) and I am so glad I did.  Michelle has free svg files which she updates regularly that you can download for free if you purchase your copy of SCAL from her.  If you already have SCAL, check out her website anyways and you can get access to her svg files for a small fee.  She also has great tutorials and youtube videos that will help you learn  how to use SCAL.

Wednesday, January 12, 2011

Christmas Cards with Papertrey Ink Stamps

I stumbled across a wonderful crafting website: http://www.papertreyink.com/.  Not only do they sell exceptionally nice stuff but they have created a wonderful community for people who use their products.  Check out their blog at http://nicholeheady.typepad.com/.   

Here are some of the Christmas cards I created using products purchased from PTI.  The stamp sets I used for these cards are: On Ice, Friendship Jar Holiday Fillers, and Big & Bold Holiday Wishes.  For these cards I used various VersaMagic Dew Drop ink pads and Copic markers.


The following cards I created using the Cricut and some stamps from Michael's Recollections stamp sets, as well as PTI's Big & Bold Holiday Wishes stamps.  In addition to VersaMagic inks, on these cards I used VersaMark Ink, Momento Dew Drops and some Perfect Pearls to add shimmer.