


Wednesday, November 9, 2011
Button Bright Blog Coming Soon
Hi everyone! This is Lauren and I have good news - I am still alive and I am ready to start blogging. I mean really blogging. I am getting my craft studio ready, learning how to record and edit videos (among other things) so I will be launching "Button Bright" blog January 2012! So stay tuned and get ready for a lot of fun.
Thursday, June 30, 2011
Young Crafters Unite Blog Hop!
If you are participating in the Young Crafter Unite Blog Hop you've just visited Joy's blog Less Is More. If you need want to start at the beginning click here!
(Don't forget to comment to be eligible for some awesome prizes!)

If this is your first time here you may be wondering about the title of my blog. It is named after my "babies", Luigi (an Eclectus parrot) and Stormy (a Russian Blue Cat)! :o)

First things first: What makes me a young crafter? I am nearly 26 years old and I am a lifetime crafter. I have always enjoyed doodling, scrapbooking and creating in general, and just recently found the craft of card making when making my wedding invitations. Once I found this card/paper crafting community I knew I had found my type of people! I started this blog so I had a place to chronical my crafting adventures to share with the world and hopefully inspire others the way so many of you have inspired me.
(I'm especially talking to you Britta! You rock!)
I don't know what I was thinking! I made this card for this blog hop, but posted it the day I finished it (which was Wednesday) instead of saving it for today.
DUH! Oh well - this card is in two posts in a row!!
Here is my card project:

My favorite thing to do is cut SVG files with my digital cutter. (Right now I am using a Cricut, but I am saving up to purchase a Black Cat Lynx!) So that brings me to my favorite company, which is... SVGCUTS.COM The bride image in my card is from svgcuts.com's svg set called "Kate's Silhouettes", which happens to be my favorite set of svg's ever! Another favorite thing included in this card: Tim Holtz's Distress Inks. If you have never used these inks, or you simply want to learn about different ways to use them, watch Britta's "No Stress Distress Inks" tutorials on YouTube! If you'd like to learn more about how I made this card, please scroll down or click here to read my previous post about this card.
But Wait! There's MORE!!
I was inspired by this blog hop to tackle a craft project I have been putting off for over a year! When we purchased our home this ugly light fixture (in my opinion!) was hanging in the dining room. I have been looking around for a new one, but I never found what I wanted. So I decided to totally renovate the existing fixture.
Here is what it looked like before:

And this is what it looks like now:

I spray painted the fixture in "Cherry Red" Kylon paint. After much searching I found the chandelier shades at Lowe's. I love the fabric - which I bought at Walmart for less than $5 yd. I adhered the fabric using spray adhesive. The ribbon and trim I purchased at JoAnn Fabrics, and I simply used my hot glue gun to adhere it.
I am very proud of the transformation... and I can't believe I have lived with that dated chandelier for a year now! It took me a few hours to make something beautiful and that completely transformed my dinning room!

So glad you stopped by to check out my blog! Please come back! :D
Comments are always welcome and appreciated! And you are eligible for some awesome prizes when you comment during this blog hop! Let me know what you think!
The next blog in the hop is: Wendy's blog Happy Stamping Designs
Tuesday, June 28, 2011
Bridal Shower and Wedding Cards
This summer we had two friends get married... which gave me the opportunity to make some fun cards! First, here is my bridal shower card.

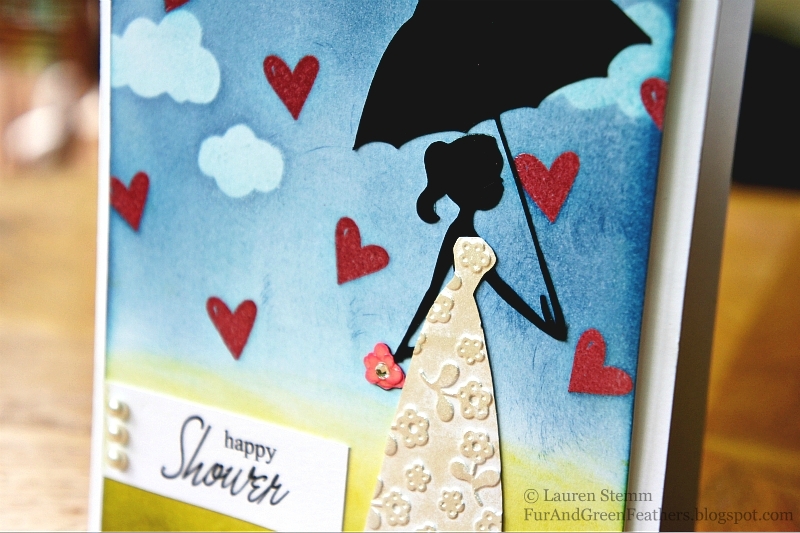
I wanted to make a card incorporating one of the bride svgs in the "Kate's Silhouettes" kit from svgcuts.com, as well as the concept of a "shower" of love. Using white cardstock as my base I stamped the hearts in VersaMark ink and then used some red embossing powder to give them dimension and shine. I created the background using distress inks and ranger's foam applicators. I masked some areas off with cloud shapes too. I cut out the bride and dress svg using my Cricut and SCAL2. The dress I embossed using my Big Shot and the Sizzix flower folder. I rubbed Ranger's Perfect Medium (which comes in the kit with the Perfect Pearls) all over the dress and then wiped on the Perfect Pearls powder. To adhere the powder to the dress permanently I sprayed it with hairspray. The umbrella is a font from WC Sold Out E bta which I downloaded free from dafont.com. Finally the sentiment I created in Microsoft Word and printed onto white cardstock. I added some pearls and a diamond to the bouquet for some extra sparkle.
I think this card conveyed the idea that I wanted the bride to be "Showered in Love"! But, in case my card front didn't get the message across, here is the inside of the card. I sure wish I hadn't spelled Forecast wrong! Oh well!!

And here is a close up:
Products Used
Stamp: Fiskars "Thank You" set (Heart)
Embossing Folder: Sizzix Flowers (Dress)
Ink: Distress Ink (Broken China, Faded Jeans, Crushed Olive, Peeled Paint), VersaMark
Additional: Perfect Pearls & Perfect Medium, Sticky Pearls
SVGs: svgcuts.com "Kate's Silhouettes" (Bride), font "WC Sold Out E bta" letter n (umbrella)
And here are the wedding cards!

The bride's favorite flowers are Sunflowers, so I had to make her a card using the awesome 3D SVG sunflower from SVGcuts.com! I used some metallic ink on the ends of the sunflower centers and used some yellow Perfect Pearls to add the simmer in the middle of the flowers. I used SCAL2 to create the cut out names. I made the background paper using a direct to paper technique with both Mustard Seed and Wild Honey distress inks. Then I stamped the sunflower image in Tea Dye Distress Ink. I also used a filigree stamp (which is hard to see in the picture) with the Mustard Seed ink.

And here is the inside of the card. Like I usually do, I simply typed up what I wanted the card to say in Word and printed it out on my laser printer. It is really easy to do this and I think it makes the card look more professional.
Products Used
Stamps: Fiskars "Family" set (filigree), PSX "E-2564" (flower)
Ink: Distress Ink (Mustard Seed, Wild Honey, Tea Dye), Brilliance (Cosmic Copper)
Additional items: ribbon, brads, perfect pearls (perfect gold)

Here is another quick wedding card I recently made.

The bird image is a SVG from the "banner day" svg set from LetteringDelights.com, which is a fabulous website! Both birds were cut on white cardstock. I inked the birds with Anirondack Alcohol Inks. I made the blue bird using a mixture of "Stream" and "Pearl" and the green bird using "Pearl" and "Lettuce". It was my husband's idea to mix-match the wings, which I love! The top of the wings are adhered with glue and the bottom of them is adhered with foam dimensionals, so the wings are lifting off the page.
Products Used
Stamps: PTI Mega Mixed Messages (Love), Studio g ditto (Botanical Background)
Ink: Memento (Tuxedo Black), Brilliance (Platinum Planet), Adirondack Alcohol Ink (Lettuce, Stream, Pearl)
Patterned Paper: K&Company (Pink Posey)
Saturday, June 18, 2011
Candy and Cookie Tables
I wanted to share some photos today of the awesome goodies that were at the party. We had both a cookie and candy table! It doesn't get much better than that!
The cookies were made by great family friends - a mother and daughter duo. They spent so much time making all of these amazing cookies, and each and every one was delicious!


And here is a platter of buttery heavenly goodness... quite possibly the best cookie ever made. Ward couldn't even keep his hands out of them for the picture to be taken!


It wouldn't be a party without a bunch of candy, right? My mom, her best friend Deb and I headed to the b.a Sweetie Candy Company, which is a huge candy warehouse in Cleveland. They have any type of candy you can think of. If you are looking for throw-back candy, that is the right place to find anything.
For example, when I was there I had to buy a pack of candy cigarettes.

I haven't seen them in the stores since I was a kid, for obvious reasons! I mean, really? Candy cigarettes?! Who thought that one up? Anyways! I remember my friend Lesley and I pretending to be waitresses in my basement (rollerskating waitresses to be exact) and we had those candy cigarettes in our mouths! We were so cool! :o) But, they did not live up to my memory of them. They taste like chalk!
Here are some photos of the candy table in all of its glory! Doesn't looking at it make you want something sweet in your mouth?

Cowtails, Rolos, chocolate covered pretzels, Tootsie Pops, Sixlets, Good & Plenty, red licorice twists (my favorite!), Starbursts, dark chocolate M&Ms, fruit slices, etc.

My mom's completely incredible idea = use kids garden tools as candy scoops! They were the perfect fit for our Spring/Flowery theme. Way to go Mom!

Thanks for stopping by my blog today. :D
Don't forget - comments are always welcome and appreciated!
Friday, June 17, 2011
Party Decor
The party my mom and I threw for my brother and sister-in-law to celebrate their marriage was a huge success! Here is a photo of the happy couple at the party!
Ward and Lisa - I love you guys!

My mom has worked at The University of Akron for over 23 years now. When we were discussing where to have the party she had the stellar idea to have the party at the new football stadium on the Club Level!
Here is the view of the stadium. Isn't it magnificent?!

I made the place cards by cutting 12x12 paper to the desired size and using my Martha Stewart Score board to fold them. Then I stamped the boarder stamp using various inks in my ColorBox Paintbox (Pastel). Then I stamped the cute little flowers in Memento Tuxedo Black. The flower stamp is from Hampton Art's "We make a Great Pair" set. To finish them I hand wrote the guests' names on the outside and the table numbers on the inside.

That brings me to the table numbers. My mom found a bunch of little frames in her basement that she purchased from Marc's a while ago and she gave them to me. I didn't know what I would ever do with them... but when I was contemplating the need for table numbers at the party, I found the perfect use for them.
Here is a sample of what the frames looked like before.
Here is a sample of what the frames looked like before.

I thought they would look awesome painted black and with the table numbers inside them.

I cut out a bunch of numbers in different colors and fonts with SCAL and the Cricut. I also cut out some fun papers to fit inside the various sizes of frames and started assembling. I love how they turned out! It was a great way to use these little frames. These are some of the finished products:

Thanks for stopping by my blog today. Don't forget - comments are always welcome and appreciated! I'll be back in tomorrow with more fun stuff from this party!! :o)
Thursday, June 16, 2011
Graduation Congratulations!
Wow - I can't believe it has been two months since I last posted. So much has been going on! I have a ton of pictures all edited and ready to post... so stay tuned. I will be posting frequently!!
What do you think of my blog's new look? I created the header and blog background, as well as other elements all on my own! I have never taken a HTML code course - so I had to teach myself. As for creating the digital background, I learned so much from this awesome tutorial on the blog Kevin & Amanda. I used various digital scrapbooking papers and elements from Summertime Designs, which offers tons of free kits. And finally - I used a file from my favorite website, SVG Cuts, for the awesome girl silhouette in my header! I used the free program, GIMP2, which is the most amazing free resource I have ever come across.
What do you think of my blog's new look? I created the header and blog background, as well as other elements all on my own! I have never taken a HTML code course - so I had to teach myself. As for creating the digital background, I learned so much from this awesome tutorial on the blog Kevin & Amanda. I used various digital scrapbooking papers and elements from Summertime Designs, which offers tons of free kits. And finally - I used a file from my favorite website, SVG Cuts, for the awesome girl silhouette in my header! I used the free program, GIMP2, which is the most amazing free resource I have ever come across.
Today I wanted to share two of my most recent cards, which were for cousins who both just graduated from college. I used the freebie image from SVGCuts.com called Graduation Cuddly Friends to make these cards.

My husband has a great cousin, Patrick, who is my only family member currently following my blog... in fact he was one of my first ever followers! So I'd like to say a huge THANK YOU Pat for all of your support!! :o) About a week ago Pat graduated from Zane State College!! Here is the card I made for him:


I've had this 12x12 congratulations paper forever, and finally found a great use for it! I inked it with Broken China Distress Ink so it would match Zane State's colors. I embossed the graduation cap and gown with my Sizzix Diamonds Texturz plate using my Big Shot. Then I inked the embossed areas lightly with the Broken China ink. I colored the skin using Copic marker E00 and simply free handed the face. The eyes were made using various punches I have. Finally, my Cricut is not cutting very accurately anymore so I wasn't able to cut out the diploma SVG that came with this file without it looking terrible. So - I made my own diploma by simply rolling paper and stamping it with the Congrats to the Grad sentiment from Papertrey Ink's Mega Mixed Messages. I also stamped the envelope with a rubber stamp.
I really loved how this card turned out... so I couldn't stop there. I decided to make another one, this time for my cousin Hilary who just graduated from Bowling Green State University. Here is her card:

I made this card using the same techniques, just switched up the colors and a few other elements. I used the Sizzix Dots embossing folder on the cap and gown. Once I did that I thought it still wasn't feminine enough so used a flourish stamp to add some subtle detail.
Here is a close up of the cards:

Here is a photo of the inside of the cards. I used Inkscape to trace the logos and cut them in SCAL2.

Products Used
Stamps: PTI Mega Mixed Messages (Sentiment), Fiskars Family (Flourish), River City Rubber Works "Graduation Hand & Hats" (just the hats part)
Ink: Tim Holtz Distress Ink (Broken China, Wild Honey, Walnut Stain), Memento Black
Copics: E00 (skin), Y21 (blonde hair), B00 & YR04 (detail on tassels)
Embossing: Sizzix Diamonds Texturz, Sizzix Dots Folder
Ribbon: Darice (Halloween Fun)
Monday, April 11, 2011
TWO Weeks from HELL
About a week and a half ago I got terribly sick with a slight fever and sore throat. I thought I had the flu or strep throat... but no meds would help. Swallowing hurt, eating hurt, breathing hurt (no kidding)! So after a few days of suffering, I finally got out the flashlight to see what was going on in there... it was a HUGE canker sore in the back of my throat. It was sort of oblong shaped, almost the size of a dime in the middle, with jagged edges. It was terrible. I have gotten canker sores since I was a toddler, as have my mom and her mom. But, this was my first throat canker. I went to the dentist a few days ago and when he saw it he exclaimed, "WHOA! That is traumatic!!" The worst he'd ever seen... hahaha! When I do things, I do them all the way!
But that is not the only horrible thing that occurred in the last week. I was walking through my house and smelled something that I thought was burning hair. (Like the smell of hair burning in a hair dryer.) I got a small whiff of it, thought it was odd, and then forgot about it. Later that night while I was laying in bed I could hear the door of our furnace banging and thought I'd go wedge it with something to keep it from vibrating. When I opened my furnace room door this is what I found:

That is our floor drain. At first I thought it was soil, because we had a ton of rain the day before... but I was wrong. It was our sewage!!! So, this is what I faintly smelled earlier in the day.
I used a spackle scrapper to collect all the gross crap. Then I sprayed it all with a bleach cleaner and mopped it up with paper towels. It was a messy, and SMELLY, job. I wore a mask and purple cleaning gloves - oh so attractive!
By the time I found this treasure the water had mostly gone down the drain but quite a lot of it went into the bedroom that shares the wall with the furnace room. Here is a picture of the damage in the adjoining bedroom.

We had to cut out all the padding that got wet. It was disgusting. We have a box fan in the window trying to get as much of the moisture out of the room because the wet carpet stinks. We are going to replace the padding and then get the carpet cleaned.
Last Thursday we called Roto Rooter to have them come and unclog our sewer drain. Seems easy enough right? Well they came and poked and prodded our yard for over 2 hours and could NOT find the access to our sewage pipe. Luckily the Roto Rooter guy is a neighbor and he did not charge us for his time. He recommended we call the city to see if they had the coordinates of the sewer access.
The sewer department did have the coordinates, and sent out two of their men the next day to locate it. Well... of course they couldn't find it either! And since it was Friday, they couldn't do anything about it until MONDAY. Fortunately our parent's live an hour away so we were able to stay at their place for the weekend because we were completely clogged... couldn't shower or flush the toilets.
Today the city came through in a big way! They sent for an excavator to dig our yard, and they were finally able to find our sewer access!!

Once they found it they sent for a truck with a tool to "snake out" our sewer pipe. After a while using the tool they had me flush the toilets in the house. BIG MISTAKE! They hadn't gotten the clog and the furnace room flooded again... and it was GROSS GROSS GROSS! Luckily Curt came home from work at lunch, so he was able to help me clean up the water and sewage before it damaged anymore of the house. We filled the wet vac 2.5 times with the nastiness that was flooding out of the floor drain.

The snake didn't work, but luckily the guys wouldn't give up! They called another team to come out, this time with a tool that sprays high powered water. It took about 15 minutes or so, but the water tool was able to break apart the clog!!! Finally our sewage is going into the sewer and not our house!!
Here is the lucky part... because we pay ridiculously high property taxes, the city offers the sewer cleaning service FREE of charge! :o) So we didn't have to pay for the 3.5 hours and 9 people it took to clean out our sewer pipe today!!
My canker is finally settling down, only woke me up two times last night. (At least I slept!) And we can finally flush our toilets and take a shower! Thankfully it is warmer outside, so my house is all opened up and airing out. It still smells a bit Port-a-potty-ish here, but it is getting better. Thank goodness for bleach!
Here's to hoping this week is uneventful!!
Subscribe to:
Posts (Atom)


